So a few days ago I finally bought a proper media console.
Truth be told, it isn't meant to be a media console. There aren't any openings in the back for air to circulate from entertainment equipment nor are there any openings/holes in the back to run cable cords through...but I digress, despite that it's perfect and I kinda love it. Kinda meaning really.
But let's rewind. This is what I started with.
![]() Yes, that is my old coffee table from my last apartment. I'm in the process of keeping an eye out for just the right coffee table (though the more I go without one the more I think I might not get one) but rather than get rid of this one just yet I decided I could sit my tv and cable/internet box on them - classier than having them sit on the floor, right? Anyways, obviously it was meant to be temporary while I kept an eye out for the right media console - which would meet the following requirements:
Yes, that is my old coffee table from my last apartment. I'm in the process of keeping an eye out for just the right coffee table (though the more I go without one the more I think I might not get one) but rather than get rid of this one just yet I decided I could sit my tv and cable/internet box on them - classier than having them sit on the floor, right? Anyways, obviously it was meant to be temporary while I kept an eye out for the right media console - which would meet the following requirements:
- provide closed storage
- wide enough that I could put decorative accessories on top
- wide enough to take up a good portion of the wall but not all of the wall
- not too deep
- simple lines
- not too high
- on budget (less than $200)
With that in mind, I originally wanted a vintage teak credenza. Something like these. But the more I started to think about it I decided, as much as I love mixing woods, perhaps I didn't want to do that here. As you know, in my little apartment my living and dining area are open to each other and, including the floor, I've already got about 3-4 different wood tones going on...I think that's enough. Plus, I didn't want the wall the tv is on to feel too heavy. So I ruled out a teak credenza and decided, like many others before me, I'd do a fauxdenza. It'd meet all the requirements plus be "light."
Then I was at IKEA and I saw this. And I thought "hmmm, that could work..." and weeks passed and months passed and I was still using the coffee table because the thought of trying to drill into what I believe to be concrete walls so I could mount my fauxdenza-to-be exhausted me. And then I was at IKEA and saw that the sofa table and again thought... "hmmm, that really could work..."- so I took some measurements at home to make sure it was right and it was and I went back and bought it. Plus, it was on sale - $199 down to $99. Awe-some.
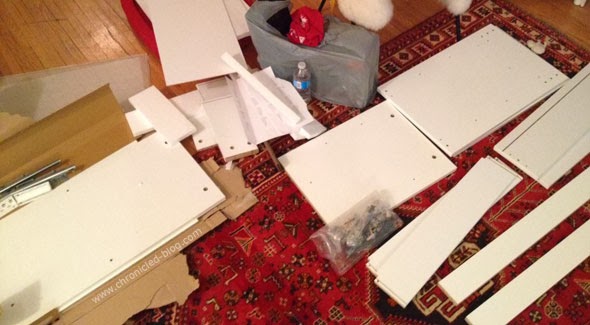
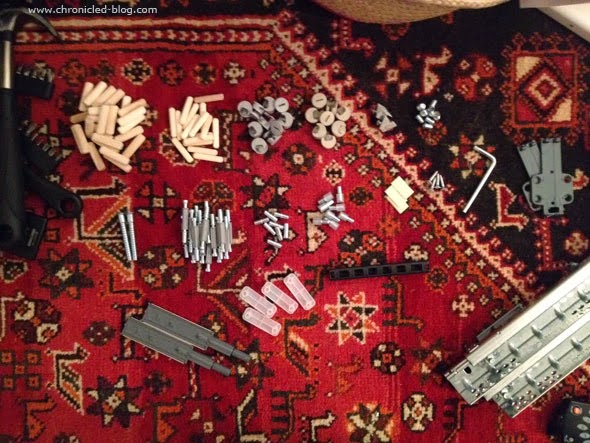
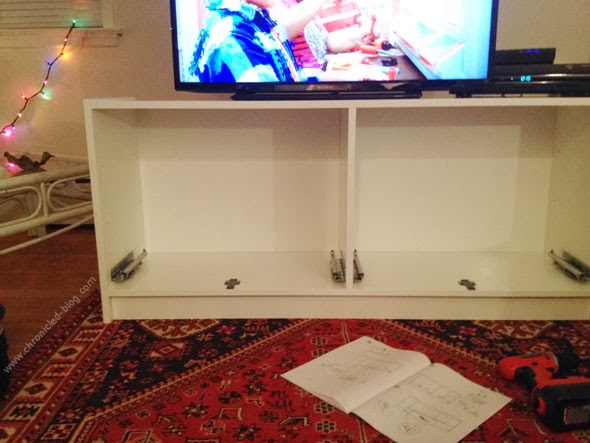
So then this happened:
![]()
![]()
![]()
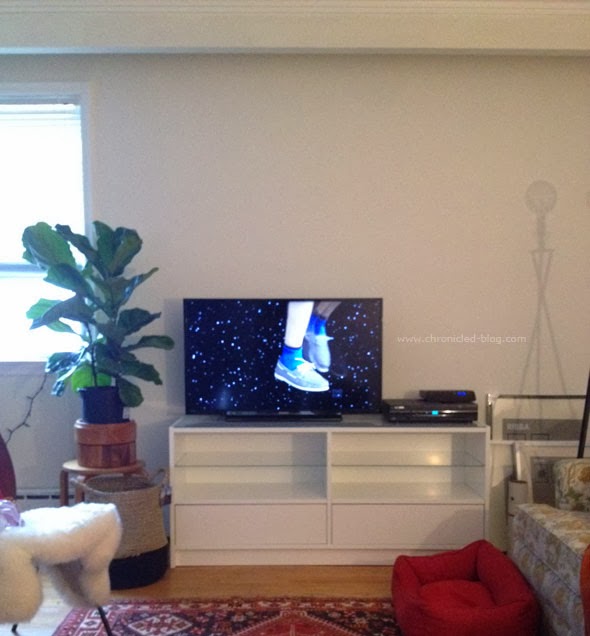
And now I have this:
![]() I'm really loving it. It reminds me of this one from CB2 but for like 1/4 the price. What I like about it? It meets all of my requirements plus I like the glass shelves--more space to display stuff (plus the shelves being glass makes it feel lighter than wood). It's also surprisingly(?) solid. The back isn't that...folded cardboard like material (you know what I'm talking about, right?) - it's a single piece of wood (which means I can't simply cut a hole in the back to run cords out of...I'll have to use that circular drill bit).
I'm really loving it. It reminds me of this one from CB2 but for like 1/4 the price. What I like about it? It meets all of my requirements plus I like the glass shelves--more space to display stuff (plus the shelves being glass makes it feel lighter than wood). It's also surprisingly(?) solid. The back isn't that...folded cardboard like material (you know what I'm talking about, right?) - it's a single piece of wood (which means I can't simply cut a hole in the back to run cords out of...I'll have to use that circular drill bit).
I put the entire thing together by myself (and felt like a boss) while watching Mrs. Doubtfire and thought I'd share some tips with you guys about putting together IKEA stuff all by yourself:
1. Following the pictures on the first few pages of the instruction booklet, group and lay all the pieces out first...yes even the screws and the pegs - everything...I even do it in the same order it appears in the booklet. That way you (a) know you aren't missing any pieces and (b) aren't wondering if you need this screw or that screw that kinda looks like it. It seems like a tedious step but just do it.
2. Make sure you have enough space to lay everything out and turn things around and put things together. It's just nicer to work in a clear space not bumping into things.
3. Follow the picture exactly. If the holes are along the bottom, just turn the piece so that the holes run along the bottom instead of trying to figure it out in reverse. Seems like a little thing but again, just do it.
4. Go in order. Don't skip ahead. Even if you really want to or you're sure what comes next. Just follow the pictures.
Follow those steps and things shouldn't be too difficult. Oh, and if you have a drill it moves things along a bit faster but it's totally not necessary...I've put other things together without one but using one this time was a little bit of a revelation. And you don't need a fancy drill. I have a fairly straightforward, inexpensive one by Black & Decker.
Anywho, back to my new entertainment unit. I kinda love it and it makes me happy. So money and time well spent...and worth the wait. I'm really liking the process of decorating this apartment. This more...thoughtful approach of trying to bring in things only that I really love and that really fit the aesthetic I'm going for and do the job I want them to do (even if the job is to look pretty/interesting) and of waiting to find just the right piece.
Next up? I've already put the cable/internet box on the lower shelf so next up is drilling a hole in the back to run the cords through, then styling up the shelves with some books etc., then putting up a gallery wall surrounding the tv...which I've already begun. With the way I've been blogging lately who knows when I'll get to sharing that...hopefully sooner than later!
What about you? Any new furniture additions recently?
*I mentioned it above but I'll say it again, this is not intended to be a media console - it's a sofa table. So should you decide to purchase it and use it as a media console that's your decision. I decided that's how I wanted to use it and it's working just fine for me.
Truth be told, it isn't meant to be a media console. There aren't any openings in the back for air to circulate from entertainment equipment nor are there any openings/holes in the back to run cable cords through...but I digress, despite that it's perfect and I kinda love it. Kinda meaning really.
But let's rewind. This is what I started with.

- provide closed storage
- wide enough that I could put decorative accessories on top
- wide enough to take up a good portion of the wall but not all of the wall
- not too deep
- simple lines
- not too high
- on budget (less than $200)
With that in mind, I originally wanted a vintage teak credenza. Something like these. But the more I started to think about it I decided, as much as I love mixing woods, perhaps I didn't want to do that here. As you know, in my little apartment my living and dining area are open to each other and, including the floor, I've already got about 3-4 different wood tones going on...I think that's enough. Plus, I didn't want the wall the tv is on to feel too heavy. So I ruled out a teak credenza and decided, like many others before me, I'd do a fauxdenza. It'd meet all the requirements plus be "light."
Then I was at IKEA and I saw this. And I thought "hmmm, that could work..." and weeks passed and months passed and I was still using the coffee table because the thought of trying to drill into what I believe to be concrete walls so I could mount my fauxdenza-to-be exhausted me. And then I was at IKEA and saw that the sofa table and again thought... "hmmm, that really could work..."- so I took some measurements at home to make sure it was right and it was and I went back and bought it. Plus, it was on sale - $199 down to $99. Awe-some.
So then this happened:
And now I have this:
I put the entire thing together by myself (and felt like a boss) while watching Mrs. Doubtfire and thought I'd share some tips with you guys about putting together IKEA stuff all by yourself:
1. Following the pictures on the first few pages of the instruction booklet, group and lay all the pieces out first...yes even the screws and the pegs - everything...I even do it in the same order it appears in the booklet. That way you (a) know you aren't missing any pieces and (b) aren't wondering if you need this screw or that screw that kinda looks like it. It seems like a tedious step but just do it.
2. Make sure you have enough space to lay everything out and turn things around and put things together. It's just nicer to work in a clear space not bumping into things.
3. Follow the picture exactly. If the holes are along the bottom, just turn the piece so that the holes run along the bottom instead of trying to figure it out in reverse. Seems like a little thing but again, just do it.
4. Go in order. Don't skip ahead. Even if you really want to or you're sure what comes next. Just follow the pictures.
Follow those steps and things shouldn't be too difficult. Oh, and if you have a drill it moves things along a bit faster but it's totally not necessary...I've put other things together without one but using one this time was a little bit of a revelation. And you don't need a fancy drill. I have a fairly straightforward, inexpensive one by Black & Decker.
Anywho, back to my new entertainment unit. I kinda love it and it makes me happy. So money and time well spent...and worth the wait. I'm really liking the process of decorating this apartment. This more...thoughtful approach of trying to bring in things only that I really love and that really fit the aesthetic I'm going for and do the job I want them to do (even if the job is to look pretty/interesting) and of waiting to find just the right piece.
Next up? I've already put the cable/internet box on the lower shelf so next up is drilling a hole in the back to run the cords through, then styling up the shelves with some books etc., then putting up a gallery wall surrounding the tv...which I've already begun. With the way I've been blogging lately who knows when I'll get to sharing that...hopefully sooner than later!
What about you? Any new furniture additions recently?
*I mentioned it above but I'll say it again, this is not intended to be a media console - it's a sofa table. So should you decide to purchase it and use it as a media console that's your decision. I decided that's how I wanted to use it and it's working just fine for me.